6
Update march 7th
Good day bloggers,
And welcome to a quick list of updates I did in the past 2 days:
- Graphics update. (Blur, Ant-aliasing, etc.)
- Reworked some of the spells, every skill does what it should.
- Renamed some skills.
- New description for skills.
- Added fix for “Infinite Mana” hack.
- Fixed character selection. (You were able to choose an empty face and hair, making you headless.)
- Fixed the Broadcast function. (It was showing “*Playername* 299: *Your message*” instead of “*Playername* [B]: *Your message*)
- Upped the refine succes rate, because 1% for refine 9 is just not enough, haha. =P
That’s all I did in the past 2 days, I’ve been busy, sorry. =P
4
[Tutorial] Adding a weapon
Good day bloggers,
And welcome to yet another entry of my blog, a special one this time, as I am going to teach you how to add a weapon to the Rose Online client, hurray!
Download link to tools and files: http://www.mediafire.com/?mdjwwoy3tnf
Don’t get scared of the huge amount of text in this tutorial, doing it will take 2 minutes for me, but explaning it with pictures and details takes about and hour, haha. Seriously though, it wont take as long as you might think.
1. The basics
First of, I’m going to make a list of the file extentions you are going to meet, so you can look up what it is used for if you forget during the guide:
.STB - These files contain alot of information, you will need this kind of file 99% of the time when you add something, ranging from weapons to armors to even monsters.
.STL - These files contain the names for everything, once again ranging from weapons to monsters.
.DDS - This is the skin of the monsters, weapon, armor, etc. It is just a picture, made in a special way so you can use it in Rose Online.
.ZMS - This is the 3D model for the item, weapon, armor, etc. you are adding or making.
.ZSC - These files are bridges that link you DDS and ZMS files, so that the game will know what DDS file goes with what ZMS file, and which item uses the ZMS and DDS file.
.VFS - This is the most important thing you will use as a developer. 3DDATA.VFS is the file that contains almost éverything you see in-game. This ranges from houses, trees, roads, to the DDS and ZMS files of weapons and armors.
And here is a list of tools I am going to use in this tutorial, and what they do. If you do not get the descriptions, don’t worry, it will become more clear in the tutorial itself:
VsfNextGen - This is a tool that is used to take things out of your 3DDATA.VFS file.
Stb Editor by Lmame - Like the name suggests, this is a tool that can open, ánd edit STB and STL files, and save them properly.
Zsc Editor by MaXxon - Doktor Obvious, this is a tool used to modify and save .Zsc files.
2. Setting things up and ready to go
OK, so let’s start by getting our client folder in front of us. I am going to use my test client in this tutorial, which is a NaRose - Evo Style client.
Why am I saying Evo Style? -well, that’s because alot of people use iRose too. iRose is an older version of Rose Online, with a different look, and it works a bit different. Some like it more then others because it’s safer to use, more flexible and has a more balanced system. I myself use Evo because there are already alot of iRose servers out there, and we’re trying to be different, also I think it looks better then iRose, but that’s just my personal preference. =P
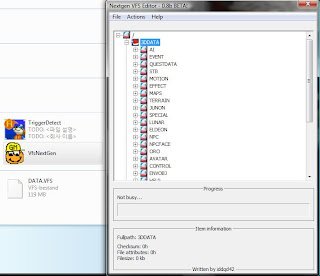
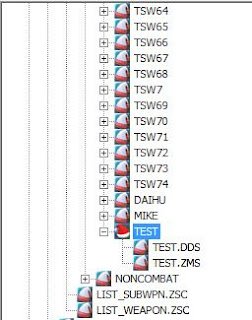
Now that I have got my client folder in front of me, I will put VsfNextGen in the map, and run it by double-clicking it. A small screen will pop up. Click the [+] sign next to the word 3DDATA, and it will expand. Now you will see alot more maps, like in my screenshot below:
Next, we are going to extract the files we need:
3DDATA/STB/LIST_WEAPON.STB
3DDATA/STB/LIST_WEAPON_S.STL
3DDATA/WEAPON/LIST_WEAPON.ZSC
I have also prepaired some ZMS and DDS files for you (Download link at the bottom of this post), which I took from jRose, which is the japanese version of Rose Online, which has alót more cool items. Normally you would just extract the DDS and ZMS file from another client yourself, but I won’t do that this time, to save you some time. If you read my guide, you will know how it will work.
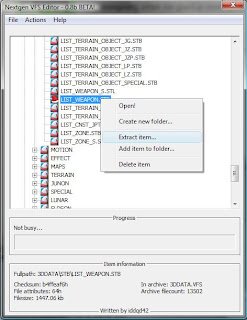
First, we are going to get the LIST_WEAPON.STB file, the name speaks for itself, it is an STB file, containing a list of weapon information. We’ve already opened the 3DDATA folder, so now, navigate to the map called STB and once again click the [+] sign next to it. As the name suggest, this folder contains all the STB files, but also all the STL files. The list you are seeing is probably pretty big, and you are probably going to overlook the file you need from time to time, as there is no search function. So just keep looking for the file untill you find it.
When you do, first, click it with the left mouse button for safety reasons, and then click it with the right mouse button. A menu will drop down, and in that menu, you have to click “Extract Item”. Now click “Browse” and select the place where you want to put the stb file. It is smart to make a new folder for this guide, so you won’t lose anything, and so you can delete it if you want, when you are done with this tutorial. Do the same for LIST_WEAPON_S.STL, extract it from the client.
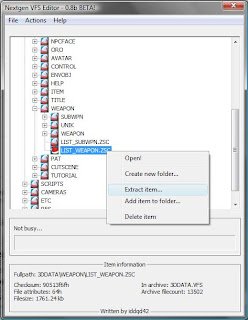
Now you can click the [-] sign next to the STB folder again so it will collapse. Now go to the folder called WEAPON, and once again press the [+] button next to it. Extract the LIST_WEAPON.ZSC file like you did with the STB and STL files.
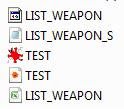
Good, so now we have all the files we need:
LIST_WEAPON.STB
LIST_WEAPON_STL.STL
LIST_WEAPON.ZSC
TEST.DDS
TEST.ZMS
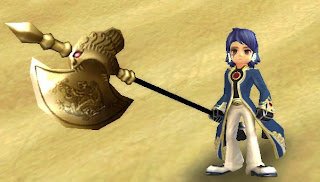
OK, now it’s time to actually start adding an item. Go to VsfNextGen, and once again, go to the folder called WEAPON in the 3DDATA folder. Next, you have to determine whether it’s a special weapon, or a normal weapon. Since my weapon is a two-handed weapon, it’s not special, so just go to the WEAPON folder, and then open the map called TWOHAND.
What you are seeing now are maps, containing the DDS and ZMS files for each weapon. Because the item we are adding is completely new, we are going to have to make a new folder. Right click the map called TWOHAND, and press “Create new folder..”. Name it whatever you want, but I suggest you make it the same as your weapons name. My weapon’s name was Test Weapon, so I will name my folder TEST.

OK, we have a folder called TEST, now we need to put our DDS and ZMS files in it. Right click the map you made, and press “Add item to folder”. Click “Browse” on the menu that popped up, and locate your DDS file, double click it, and press add item. Now do the same again, except this time, add the ZMS file.
5. Adding the item to the STL and STB files.
Next, we are going to add the items to your STB and STL file. Open your stb editor. The one I am using in this example requires Excel, if you do not have Excel, look for another tool on this site:
http://forum.dev-osrose.com/viewtopic.php?f=32&t=1026
Next, click on the large button at the top left of the editor with the text “Open Control Panel”. Now click “Load STB” and then locate and double click your LIST_WEAPON.STB file, it will start loading, wait till it’s done, and do the same with “Load STL”

The STB editor has now loaded the STB and STL file, as you are probably already seeing, you now have a huge list with things you do not understand, except for the weapon names at the left of the list. If you are a game master, or if you have your own server, you probably know what an item ID is, if you don’t:
An Item ID is a unique number assigned to an item to help the client identify what it is, what it looks like, and what it does. You will find these numbers to the left of the item names.
Pick an empty row, which means that everything on that line is empty, except for the ID. (Do not delete or change the ID, ever, that just wouldn’t be smart. =P) let’s start by typing an item name in the second row. I am going to go with Test Weapon, it’s probably not the best name ever, but heck. =P
Now, press the big gray button at the top left that sais “Item Editor”. This will open up another menu. Click the white bar at the top left of the menu, and a drop-down menu will appear. Find your item’s ID and item name, and press enter. Nothing much will change, everything will still be empty. I don’t think this part needs much explaining, so I am just going to fill it in, and you can fill in whatever you like, and look at my example if you don’t know what to fill in. Once you are done, click the “Save Changes” button, and you will probably see that alot more information is written down next to your item’s name.
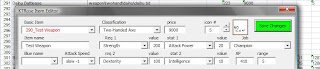
Scroll all the way to the right, and stop at row BD, it will be empty, but it it’s filled in everywhere else. Now fill in the following: LWEA*item ID*, so if my item’s ID was 201, it would be LWEA201.
Now go to the STL tab, by pressing the tab called “STL Reader” at the bottom of the Excel screen. Once again, find an empty row, and fill in the Weapon’s name and the description, where it sais LWEA*Number*, change it to the LWEA*number* you made in the stb file. In my case this would be LWEA201.

OK, now you are done with the STB and STL files, open the Control Panel again, and press “Save stb”, once it is done saving, press “Save stl”. Click Close Control Panel, and minimalize your stb editor, because you might need it later for the ZSC file.
6. Adding the item to the ZSC file.
Alright, almost there, the only thing we have to do now is edit the zsc file!
Open up the ZSC editor, and when it opens up, look at the top-left part of the program that pops up. Where it sais: “Entry [White box]“, fill in the ID of your weapon and then press “Jump To”. Even if it looks like nothing change, something did, trust me. If you forgot the ID, just open up your STB again.

Next, click “Add ZMS Resource”, locate your ZMS file, and double click it. Scroll down to the bottom in the box below the text “ZSC Selection and Mesh Values”. There you will see a link that looks alot different then the other links, so click it with your left mouse button, and then press “Rename ZMS Resource”. Change the link like I did in my example, but if your map or ZMS name was different, change it.
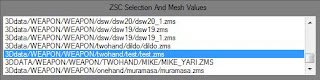
Now do exactly the same in right part of the ZSC editor, the DDS part. Press “Rename DDS Resource”, and the rest speaks for itself, right?
Now I’m going to skip some stuff because the chance of you using it is very unlikely, so just fill in everything like I did in this example:
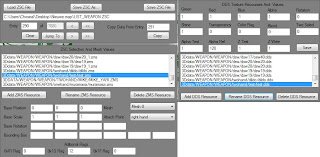
Filled everything in except the part where it sais “Bounding Box”? Good, now use this tool to found out what to fill in there, there should already be a guide on this in that topic:
http://forum.dev-osrose.com/viewtopic.php?f=32&t=2527
OK, now press the “Save” button at the right part of the ZSC editor, and then press “Save ZSC File”, and you should get a confirmation.
7. Putting everything back where it belongs
OK, we are done with everything, time to clean up our mess! Close down your stb and zsc editor first.
Open up VsfNextGen again, and go to the STB map. Right click the LIST_WEAPON.STB file, and press “Delete Item”, do the same for LIST_WEAPON_S.STL.
Now right click the STB map, and press “Add Item”. Add the STB file we just changed, and do the same for the STL file. Don’t forget to always check if VsfNextGen added the files correctly, it can be a bit tricky at times. =P
Now go to the WEAPON folder, and delete and re-add LIST_WEAPON.ZSC like you did with the STB and STL file.
Great, now close VsfNextGen, and start up your client.
Once you logged in, it’s time to test you weapon. In my case I would spawn the item by typing: /item 190 8 1.
Tadaa, if you did everything right, you will have your first weapon, congratulations! =D
Now isn’t that just fantastic? -now go pratice some more, haha. At first it took me a while to add items, but now I can add an item in 2 minutes or so, so practice doés make perfect, right? =D
If you have any questions, or if you found any errors, don’t be afraid to ask/tell me on my blog! Also be sure to expect more tutorials in the near future, I take requests. =P
Credits for the tools go to the people from OsRose, credits for the ZMS and DDS files go to jRose. Please do not distribute this tutorial without giving credits to the original poster, me. =P
3
Part 2 Adding Or(l)o
Good day blogger,
And welcome to my third entry!
Since I am now done with Oro, I am thinking of things to do now, so I’m just going to list them down:
- Think of a new nickname.
- Add some more weapons.
- Add some more armors.
- Keep updating this blog. =P
- Find a way to connect the jRose and NaRose oro maps together.
Things I have to do when I’m done with the client, and thus transfer everything to the new host.
- Change the server settings to fit the new host.
- Change the client’s neoncube.inf to the new host.
- Dump the updated SQL file to my desktop.
Some of this might not be very interesting to you, but to some of you, it gives a clear sight of what’s left to do.
If any of you has an idea, for a nickname, or how to connect the maps, or..if you have items you would like to add to our client, just reply here, and I’ll be sure to reply too. =3
Who knows, if I like the suggestion, and it works out, you might earn a little present, keke~ >:3
That’s all for this morning folks, be sure to tune in tonight to see what I did. =3
1
Part1 Populating Or(l)o
Good day bloggers,
And welcome to yet anotherone of my posts. =3
For the past couple of days I had been working on populating oro, or orlo, and I wanted to make a little guide for it. -but ofcourse something went wrong. I thought you had to add the monsters in manually, after I tried adding them automaticly, which failed. Turns out something just went wrong, and when I tried again, I populated Oro within seconds, npc’s included!
It’s now full of monsters and npcs, unfortunatly it doesn’t have a return scroll, that might be a problem..
It would mean you would have to go to the Oblivion Temple each time you want to go to Oro, and then take the Orlean Portal. I’ll have to start working on that.
On another note, I only did the NaRose maps so far, the jRose maps, Helio Polis, Geb Desert and Paradise of Rah are still empty, monster and npc wise. I’m not sure how I’m going to connect the NaRose and jRose maps together yet, but I’m sure I can think of something..
One thing I have learned so far, is that all Oro inhabitants are dumb, the monsters are snakes with eyes bigger then their body, and the inhabitants are fat and big dummy’s. Actually, come to think of it, there are only 2 usefull npcs in all of Oro, one sells food, and the other stores things..
But it’s a great place to see, even though there is just alot of sand..And snakes..damn you snakes! I dare you to touch them!
-seriously though, those little buggers are fast, deadly, and after yóur flesh!
Oro will be a level 200+ leveling area, due to the fact that the lowest level monster on Oro is level 202, and they come in packs! Also, keep an eye out for the level 230 Grand Master Devourer, it hides in the sand and waits untill an unsuspecting Visitor like yourself comes along..
I will add more pictures and information later, I hope you enjoyed the first status report!
So once again, good day, good night, good evening untill later and far thee well!
Ps: Also I would like to take a moment to thank everyone that helped me so far, especially Muddmann for his development work, even though he is busy, and Riol, for getting us into Elite Kingdoms!
Thank you all for your great support!
1
Welcome Kingdom Rose players
Hello bloggers,
And welcome to my blog page!
What is it about?
This blog will be all about Rose Online, what I’m doing, why I do it, some tutorials, and a progress report. I will try to update it daily.
Why are you keeping a blog?
So that the the loyal Kingdom Rose family members will be able to read everything that is going on, but it’s also for beginning developers. Because I was a newb once too, I want to give everyone the oppertunity to learn how to “work” with the Rose Online client.
This was my first post, I know it didn’t contain much usefull information, but be sure to check it out tonight, because that’s when the magic happens, I’m going to write my first, detailed progress report!
Well, good day, good night, good evening untill later and far thee well!